NZBGet Setup Guide

NZBGet is a fast, lightweight, and customizable Usenet client written in C++. It’s known for its low system resource usage, strong automation features, and cross-platform support.

This guide will walk you through everything you need to know – from installing and configuring NZBGet, to setting it up with Docker, to learning exactly how to use NZBGet with NZBs and automation tools.

Want to see how it compares to other NZB downloaders? Check our NZBGet Review.

What is NZBGet

To access Usenet, you need a newsreader. NZBGet is a newsreader designed to process NZB files and retrieve articles from Usenet servers.

Because it’s written in C++, NZBGet runs faster and consumes fewer resources than Python-based clients like SABnzbd. That makes it perfect for low-power devices like Raspberry Pi, routers, and NAS systems.

It’s also highly customizable, with official add-ons and community-developed extensions that support automation, search integration, improved article handling, and more.

The one limitation is that NZBGet is an NZB-only client – it can’t be used for browsing text discussions on Usenet. But for binary groups, it excels in performance and efficiency.

Tip: If you’re new to Usenet overall, start with our Usenet Tutorial before diving in.

How to Install NZBGet

Desktop Installation (Windows, macOS, Linux)

1. Visit the NZBGet download page.

2. Choose the latest stable release for your operating system.

3. Run the installer package and click Next.

4. Accept the license agreement and click I Agree.

5. Select your installation folder and click Install.

6. When the wizard finishes, click Finish.

You’re now ready to configure your servers.

Configuring NZBGet Servers

The first time you launch NZBGet, you’ll see the main NZBGet screen:

1. Go to Settings > News Servers.

2. Enter your Usenet provider’s server details (hostname, port, username, password, SSL).

  • These are typically found in your Usenet provider’s dashboard.
  • You’ll need to have a Usenet provider to use NZBGet. We recommend Newshosting or Eweka ifor their long article retention and high completion rates.

3. Use port 563 (SSL) whenever possible for security.

4. Click Test Connection to confirm everything works.


Once the connection test passes, NZBGet is ready to use.

For more background, read our guide on What is a Usenet Server?.

Configuring NZBGet Servers

One of NZBGet’s advantages is the ability to manage it from other devices on your network – or even remotely over the Internet.

To configure remote access:

  1. Go to Settings > Security.
  2. Adjust these fields:
    • ControlIP: set to 127.0.0.1 for local-only or 0.0.0.0 for remote access.
    • ControlPort: choose an unused port between 49152–65535.
    • ControlUsername / ControlPassword: set strong login credentials.
  3. Save changes.

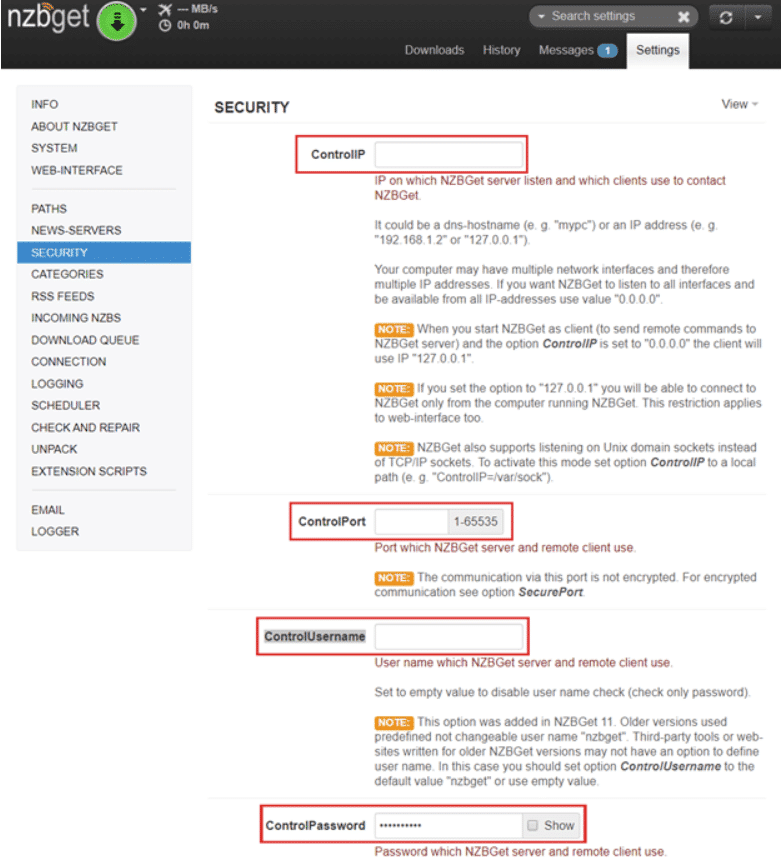
You can now log into NZBGet from other devices using your chosen port and credentials. For security, always use unique usernames/passwords and limit remote access unless needed.

Configuring NZBGet Servers

Docker is a popular way to run NZBGet on NAS systems or servers, and on operating systems that don’t have a native version of the NZBGet app.

Step 1: Install Docker

  • Download Docker Desktop from the official Docker site.
  • Run the installer and complete the setup wizard.

  • Accept the Subscription Service Agreement

Step 2: Run NZBGet in Docker

1. Open Docker Desktop. You will be given the option to set up an account or to continue without signing in. We won’t cover the sign up process since it’s self-explanatory, but either way works.

2. Search for linuxserver/nzbget in the images panel

3. Pull the image and click Run

4. In Optional Settings:

    • Name the container.
    • Set Host Port (e.g., 8089).
    • Map volumes for NZB and Articles directories.

5. Start the container

6. Open a browser and go to: http://127.0.0.1:8089/

7. Log in with:

    • Username: nzbget
    • Default password: tegbzn6789 (or blank in some versions).

You now have NZBGet running in Docker.

How to Use NZBGet

  • The heart of this guide is learning how to use NZBGet once it’s installed and configured.

Adding NZBs

There are three main ways to add NZBs in NZBGet:
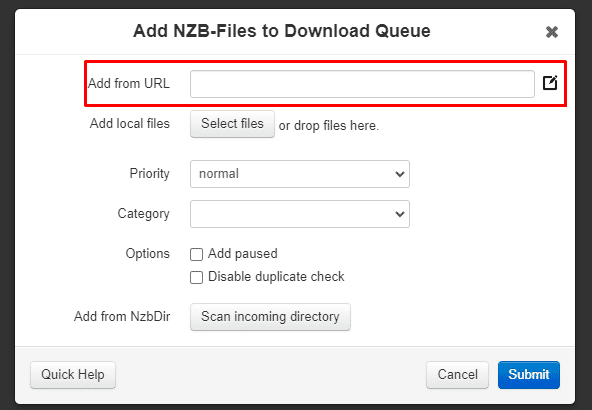
1. From a URL

    • Copy the NZB’s URL (from your indexer).
    • Click +Add > Add from URL.
    • Paste the link and click Submit.

2. From a local directory

  • Save an NZB file to your computer.
  • Click +Add > Select files.
  • Choose the NZB file and click Submit.
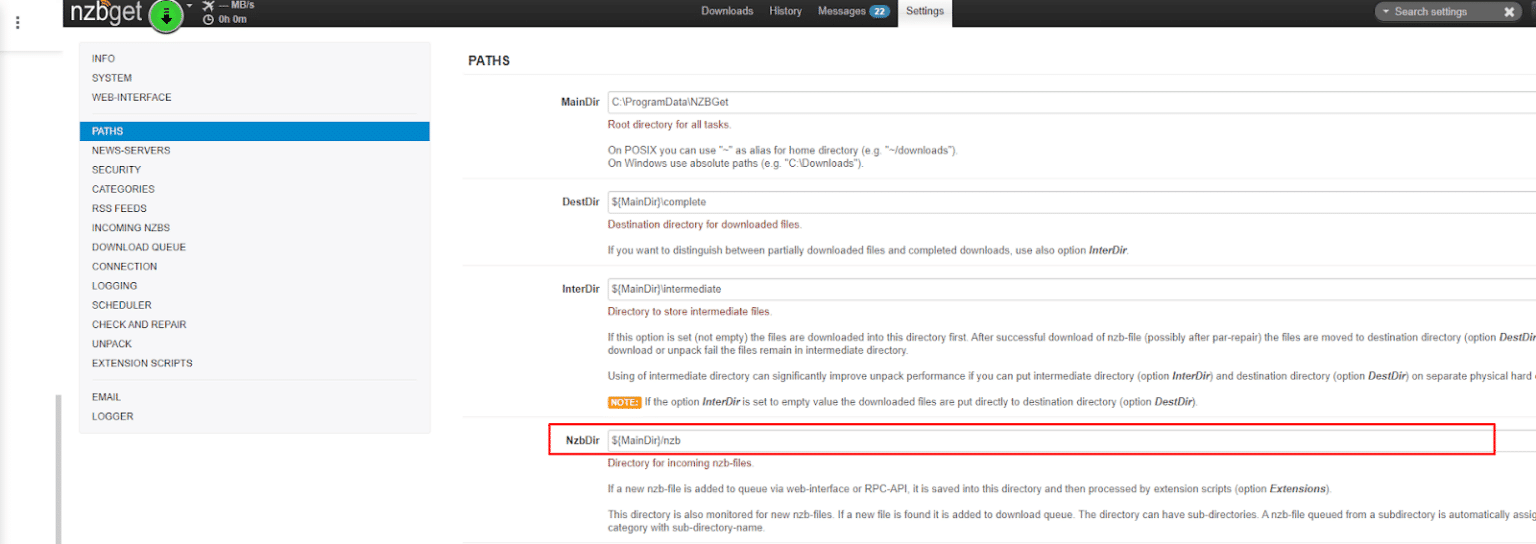
3. From an NZB directory
  • Go to Settings > Paths > NZBDir
  • Set a folder for NZBs
  • Any NZB you drop into this folder will be picked up automatically

Learn more about what an NZB is if you’re just starting out.

Automation

Pair NZBGet with tools like Sonarr, Radarr, Lidarr, and Prowlarr for full automation. These apps search indexers for articles and send NZBs directly to NZBGet, creating a hands-free workflow.

Optimization Tips

  • Adjust connections based on your provider’s max limits.
  • Enable SSL (port 563) for security.
  • Use multiple servers for better article completion.
  • Set priority levels for backup servers.

For more on indexers, check our Usenet Search Guide or visit our top rated Usenet search solutions.

Troubleshooting NZBGet Setup

Even with a simple setup, you may run into issues:

  • Can’t connect to server?
    Double-check hostname, port 563, SSL settings, and credentials.
  • Default password not working?
    Try tegbzn6789 or leave the password blank depending on your version.
  • Downloads failing?
    Increase connections, verify retention with your provider, or add backup servers.
  • Slow speeds? Test multiple ports (119, 563, 443) and ensure no firewall is interfering.


Frequently Asked Questions About NZBGet

What is NZBGet used for?
NZBGet is a Usenet client designed to process NZB files and retrieve articles from binary newsgroups quickly and efficiently.

How to use NZBGet step by step?
Install NZBGet, configure your Usenet server (hostname, port, SSL, credentials), then add NZBs via URL, local file, or NZB directory. For automation, connect apps like Sonarr or Radarr.

What is the default port for NZBGet?
The default web interface port is 6789. For secure Usenet connections, most providers recommend port 563 (SSL).

What is the default password for NZBGet?
The default username is nzbget. The default password is tegbzn6789 (or blank, depending on version).

What’s the difference between NZBGet and SABnzbd?
Both are free Usenet clients. NZBGet is written in C++ (faster and lighter on resources), while SABnzbd is written in Python (bigger community and easier plug-ins).

Final Thoughts on NZBGet

There’s a lot you can do with NZBGet – from basic NZB importing to full automation with Sonarr and Radarr. It’s lightweight, powerful, and perfect for both beginners and advanced users.

Taking the time to set up NZBGet properly helps you get the most out of your Usenet subscription.

For a full breakdown of its pros and cons, see our NZBGet Review.

And if you’re just starting out, consider using Newshosting or Eweka as your Usenet provider – both work seamlessly with NZBGet and offer SSL-secured connections, high retention/completion, and fast speeds.

Picture of Top10Usenet

Top10Usenet

Top10Usenet is dedicated to bringing you reviews of Usenet services.